DUE TO ISSUES WITH GOOGLE PHOTOS ALL IMAGES AFTER AUGUST 2015 ARE NOT SHOWING, I AM TRYING TO FIGURE OUT HOW TO GET THIS WORKING!

Tuesday, September 25, 2012

Snaking wire thru wall with minimal damage.

I had a door bell installation recently. The outer wall is brick. First I drilled a hole from the outside in (measuring of course the height of this light switch first). Once that hole was exposed in the wall behind where the door bell was going to be installed, i took my drill bit and angled it up inside the same hole that I had drilled from inside. There I was able to send my snake up the wall to the drop ceiling where the wire had been run. 


Add caption

Once the snake was in place I was able to fish my wire down the hole. (I did have to open the hole a little bit to allow the snake with the wire taped to it to pass thru, since my hole was so small) 


Once this was accomplished all I had to do was pass the wire straight thru the hole to the outside so that I could install my door bell. 

I did not take photos of everything else, as I was short on time, and well... I do still have to eventually return to this install when the internet is working to make sure everything is set up properly. Oh yeah, and finish wiring the relay for the door buzzer. 

Friday, September 14, 2012

Patch cord installer ruining my neat rack installation.

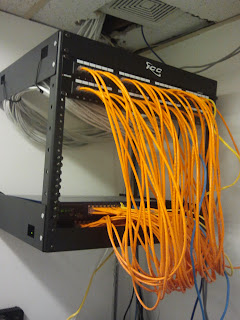
This is what everything looked like after the PC guy connected all the patch cords. 

Recently I completed an installation of this rack, and around 41 or so CAT5 runs. It took about a week to complete from start to finish - including all testing, labeling and mapping out where each wire goes to. 
That project can be viewed HERE 

I was called back to the customer to remove the old network cabling since the PC vendor came and moved the switches over and connected up all of the patch cords.

The switches are just sitting on the bottom of the rack, they are not on mounts, wings, rails, whatever you want to call them. They are just on top of one another on the bottom part of the 8U rack. 

The patch cords are sloppy, and make the whole project look like a complete and utter mess. 

I hate when I spend so much time making sure that everything is installed properly, and neatly to have someone come behind me and slop everything together, especially on a new installation. I can probably understand someone working like this if there was already a mess there, and they just wanted to connect everything up quickly and go, but he should have neatened up these patch cords. I was going to strap them up neatly, but I did not have time as I was cutting out old wiring at the customers request, and taking it back with me on the train to throw into my scrap wire pile. 

How to get around cross beams

Wide angle of channel made to get around cross beam. 
Close up of channel that was made to get around cross beam with CAT 5 cabling.

Installed jack plate over channel temporarily until customer can have channel plastered over.

Close up of jack cover hiding wire channel 

Sometimes when you are pulling cables you come across cross beams. Sometimes this is easy to get around, especially when the walls are up, or if you were aware of their presence and you are able to place the jack in an alternate location. 

Sometimes you just cut out your hole for your low voltage mount, try to snake the wire up or down the wall and find out that your snake is not making it all the way past the drop ceiling. 

In those cases you can measure how far your snake is making it up and down the wall and make a small channel. Snake the wire from one side of the channel up (or down) then bring it around the beam and snake the cable the rest of the way. Many times you can get away with a blank electrical plate as a cover. I did not have any blank electrical plates so I used a single hole plate with some white tape to cover the hole (a blank would have required me to make the hole bigger to accommodate the depth of the blank which I do not think was worth it, when the customer can either get a blank plate themselves for about $1, or have someone come and plaster up the hole when the complete the painting. 

small 5 jack network

The 6 port jack and CAT5 wires are the only thing I installed,
everything else already was installed and mounted as you see 
Provided a service loop in the CAT 5 hidden behind the water cooler
for future access for repairs or changes. 

Connected the patch cords to the router. 

Very small network

I had to run some surface CAT5 runs and unfortunately I only had black CAT5 wire with me, and no stapler. There was some space to wedge some of the CAT 5 underneath the baseboard molding, so i put screws at the turns of the wire to keep it nice and tight. The customer actually commented on how neatly the wiring was run - although this is not how I would normally go about wiring things. It was a very small job that needed to be completed quickly because it occurred in the middle of a busy work day, sandwiched between several other larger installations. 


As the two added jacks needed to be in the same room, and everything was surface run I did not want to have to run everything back to the router in the other room and install the switch next to the router, so instead I used an existing working CAT5 for my uplink and connected the new 2 runs to this 8 port switch that I installed. This will provide the customer with several extra CAT5 ports in this room so that they can connect their VoIP conference phone as well as an additional VoIP phone, and computers.